Class Projects
(2/4/2001)
I'm going to keep a running gallery on the projects we finish in
class. "Gallery" is probably too strong a word, but it makes me feel
important. The following are the pictures and descriptions of the class that
will hopefully never end. Clicking on the picture will get a larger picture.
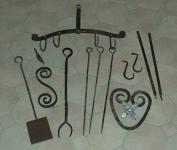
Here's the "group picture" of my first 8 weeks of class. Starting from the left we have:
Flipper: Basic twisting, riveting, and eye-making. The flat is just sheet metal.
'S' scroll: This was to practice scrolling. No real use, but I like the way it turned out.
On top of that a leaf: I didn't like the way it turned out at all. But I've gotten better since.
Turkey Fork: Splitting, twists, tapers, etc. One of my favorites. Haven't stuck it in a turkey, but it flips steak well.
Three skewers: Here's where I learned to make eyes.
Trivet in progress: Learned scrolling and split a pipe for the flower. It's got feet and the flower mounted since then.
Nail hooks on top of that: One of them was my first project. Learned tapering, twists, drawing down, bending... all in my first 2 hours of blacksmithing.
The bars to the right were used to make the feet of the trivet. There are tenons on the ends.
On top of it all, a utensil rack. Learned shouldering on the hooks, simple scrolls, bending wide radii, etc.
This is a toilet paper holder. Learned upsetting (the ball at the end) and the corkscrew. See what I mean about leaves? I'm feeling better about this one. I like the way this turned out, too. Now how to convince my wife it really does fit in the bathroom decor.
(05/19/2001)
This is the completed trivet from the pieces shown in the "class picture"
above.
This trivet's main point is a ring I welded in a gas forge. The weld was a major accomplishment. It took three classes to learn to weld, but it was worth it.
Here's my latest class project, sort of a "capstone" project. The candle-holder arm is two sections, fully articulate, and slides up and down the vertical rod. This project was interesting mainly because it was something my teacher got from a picture in one of the blacksmith mags (can't remember which one). He had never tried it before, so we, as a class, worked through the design and figured out how to put it together. One tip on this project - Keep the part of the arm that slides up and down the vertical thick. A thin eye here will make it tough to keep horizontal.